Implementation of the shape split

At this point, the next big leap would be to start writing code that could split shape into two shapes. This has to be achieved in order to successfully fill in a piece of design with color.

I started the issue with for the line function as there is a less complicated solution. Firstly, the definition of shape might be a bit confusing. Here in the application, a shape is a set of vertices that define the polygon and are used as spawn points too.

I began implementation with the idea of creating spawn points for the line that has been recently generated. These points will be used later on. The method that generates a line also returns indexes of start and end points in the array of spawn points of parent shape. That way I know at which part the spawn point array must be split. A new shape is created out of spawn points of parent shape starting from start index, ending at end index plus spawn points that were generated previously.

Lastly, the spawn points list of the parent shape has to be modified as well. To do so, a new list is created which will include all the spawn points from endpoint index to the end of the parent’s shape spawn point array, from the index 0 to the start point index, plus all spawn points from the previously generated line in reverse. This has to be done because the SAT algorithm only accepts polygons that are defined with vertices in the counter-clockwise order.

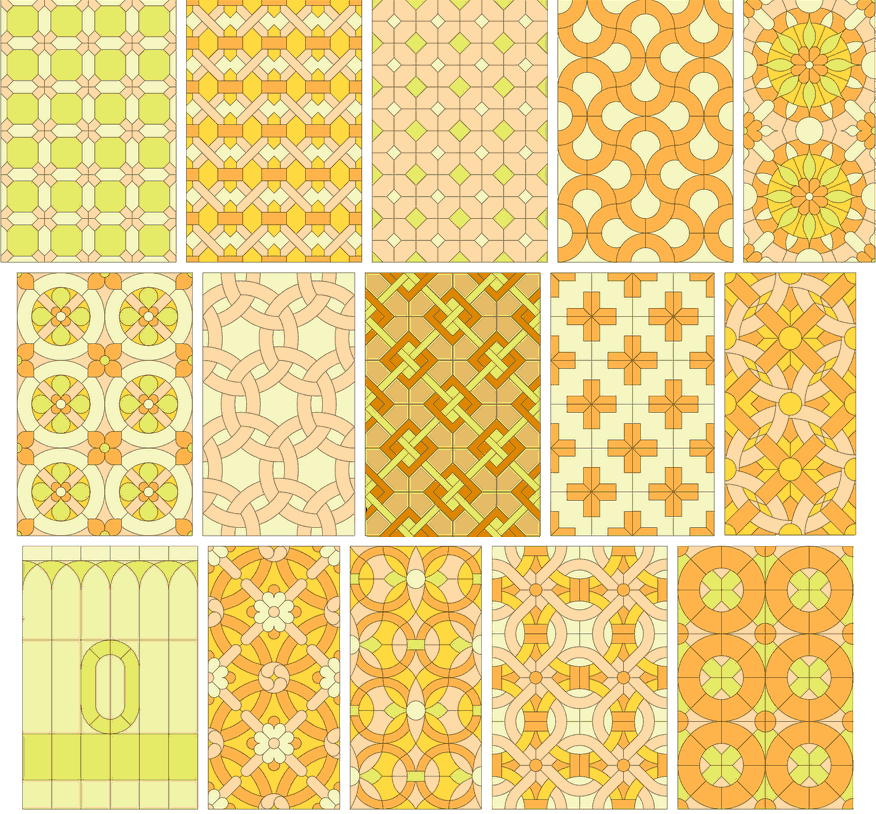
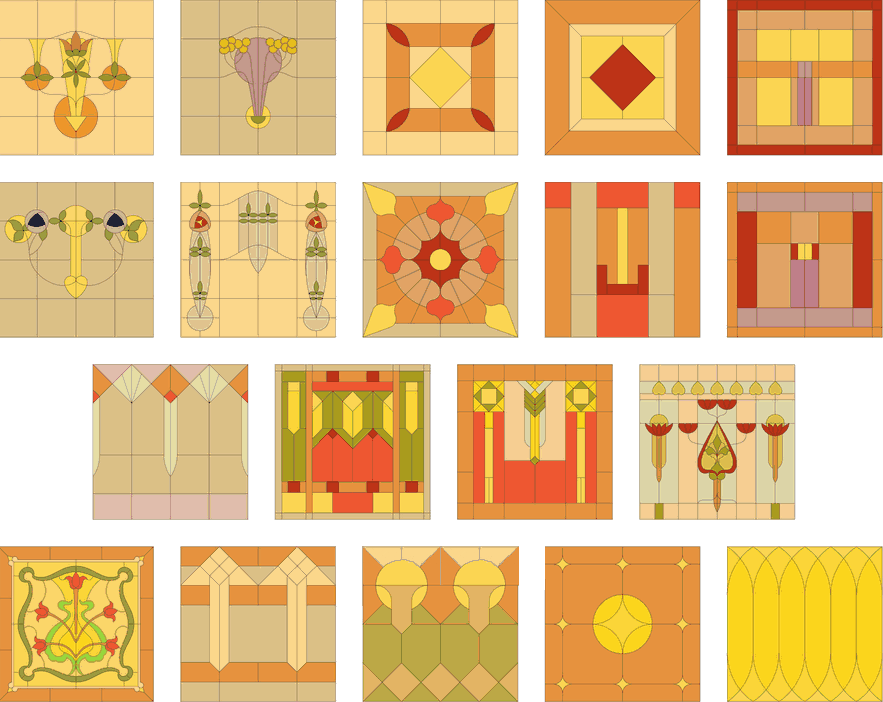
Here are some results of the first version of new implementation:

1958.jpg

2080.jpg


4949.jpg4861.jpg


Although at these runs designs look as it is intended, it is still pretty buggy and there are some edge cases that are not fixed at the moment.

Implementation of the Collision detection

In the previous post, I have mentioned the problem that arises with the implementation of the Bezier curve – it can go outside of the shape. This time I have tried to fix this flaw.

Before starting to write any code, I did some research on the Collision Detection. Turns out it is a tricky part. I found out that up to this day, there is no such algorithm that could detect collision for all the shapes including the concave ones. For the beggining, I could assume that all the shapes are convex but later on this will have to be fixed too.

As for the collision detection algorithm, I have decided to go with dyn4j – Java Collision Detection and Physics Engine library which already has collision detection algorithms. One of them is SAT which stands for Separating Axis Theorem. It states that if we can find a gap or separation between two objects then they must not be touching.

The way that I have decided to approach this task was to create a convex shape out of spawn points and check for every point of the line whether it is not colliding with the shape. It if is, that Bezier curve should be re-generated.

Here is the result of SAT implementation:

535.jpg

591.jpg


958.jpg1019.jpg


This raised another issue for the futher development of the project. I will need to find a way to transform any set of vertices into convex shapes as the SAT algorithm does not support concave shapes. Because the first piece is concave, for now, I will leave it as it is.

Implementation of the Bezier curve

As the line function is implemented already, I have decided that the next step could be an implementation of the Bezier curve. Just as before, I implemented a very basic model of the curve to get the work started.

Similarly to the line function I have created a method that picks the start point and end point randomly from the list of spawn points. In addition to that, the control points are chosen randomly in a range of -300 to 300 from the starting point. It is a silly implementation, but a good starting point.

Here are some examples of the result:

1144.jpg

1394.jpg


708.jpg

888.jpg


There are two already issues that will have to be fixed during the further development of the project. Firstly, the Bezier curve generates loops. Secondly, the curve can go outside of the shape. Both of these could ruin the design and the meaning of the shape causing troubles with color filling.


Implementation of Line function

At this point, I have decides that it would be a perfect start for new improvements of the project’s application. Piece rendering was the last thing that has been done. To build on that, I have implemented the line function and Bezier curve to fill in the inner design of the Stained – Glass.

For the beginning, I have decided to implement a very simple method for both line and bezier curve. What I have thought of doing is to have an array of calculated spawn points of the whole piece and choose randomly 2 of those marking starting and ending points for the curves.

The first step that had to be done before start and end points could be chosen was getting the list of all spawn points available to be selected.

665.jpg

When this part was done, I have created a method that would choose start and end points for the line function from the list of all spawn points. It has to be noted that starting and ending points has to be chosen so that the line could split the shape into two separate shapes. Thus, I am measuring angles of spawn points and spawn points + 1 and spawn points – 1 to check whether angles are the same which would mean that the shape cannot be split into two.

Here is the result of line function implementation with 1 line and 45deg angled piece.

1119.jpg

1367.jpg


And some pretty interesting combinations could be achieved already with 10 lines although it is not correct as the lines are overlapping each other:

1735.jpg

1636.jpg

Further research on Bezier Curve

I have continued to research on Bezier curve as it proved to be the easiest way to generate various kinds of curves.

The next step that I have to sort out is the position of the control points. I have to generate bezier curves in such a way so that the loop would not be created. Although it is not a high priority task at the moment, it will concern me later on.

I have also created a small script that will allow me to easily test my theorems on bezier curves

336.jpg

466.jpg

Bezier Curve

Bezier Curve is another promising formula / curve that could potentially be used in the project.

It is generated by having 4 points on the graph: one for the start, one for the end and two control points for creating the curve. There is another variation of the Bezier curve with only one control point called quadratic Bezier curve, but the version with two provides more flexibility, variability.


cub_bez_curve.jpg


Although it is not possible to achieve sharp edges, Bezier curve brings more variations of curves comparing to Super Ellipse. Because of that, I believe it could be used for generating Stained Glass design inner lines.

Here is a Cubic Bezier Curve plotted on the graph.

Super Ellipse

Because Super Shape does not look like a great fit for Stained Glass design generation, I had to continue on researching the topic of formulas. This time I tried out the Super Ellipse.

The Super Ellipse has 3 parameters of which 2 are for regulating the size of the shape across x and y axis. The other one is a more important parameter which is used to achieve different curvatures of the shape.

393px-Superellipse.svg.png

However, it could be extended a bit more, introducing another exponent m. With this addition, the shape can have two control points for the curve.

I’ve made a Processing script to test it out and see how it would perform.  Here are some examples of what Super Ellipse is capable of:

superellipse-2859.png

superellipse-4075.png


superellipse-6249.png

superellipse-5158.png


superellipse-6613.pngsuperellipse-471.png


Then, I made some adjustments to the formula so that only 1/4 of it is rendered due to the reason that I need to generate a line / curve. Moreover, it turns out that out of 4 parameters, two of them could be used to generate starting and ending coordinates of the curve which is exactly what I need.

superellipse-1156.png

superellipse-2051.png


superellipse-2293.png

superellipse-2766.png


superellipse-10233.png

superellipse-551.png


This is a very versatile formula as it is capable of generating straight lines, smooth curves, and 90° angles. So far, it does look like a potential function for further development.

Here is a website where the Super Ellipse is plotted on the graph

Super Formula

As the basic framework is done, I started researching for interesting looking formulas that could be used to generate the inner design of the stained glass. The one that looks really promising is Super Formula.

The Super Formula, also known as Super Shape is the generalization of the Super Ellipse. It is used to generate some very interesting and complex shapes using 5 different parameters.

I created a small program on Processing to test whether Super Formula could be a viable choice for this project.

Here are some examples of what could be achieved with it:

screen-0259.png

screen-1224.png

screen-0849.png

screen-6711.png

Although it is possible to generate some beautiful figures with only one formula, it has a major drawback. I could not find a way to draw part of the figure that would start at, for example, (x1, y1) and would end at (x2, y2) because there is no such combination of parameters that would allow to predict the end point of the figure / curve, or it is not a straightforward solution.

The start of the Framework

I have decided to pursue this project with pattern-based designs. More specifically, with a circular shape that uses the Kaleidoscope effect as I find it the most interesting concept. All the work will be done in Processing – a graphical library that is built on top of Java.

For this week, I’ve started on building the framework – a base shape of the stained-glass so that it could be used later on generating inner parts of the design.

To begin with, I had to generate one piece:

#.png

Then, the bottom arc was added:

#.png

The next step required me to add copies of this piece with specific transformations to that the Kaleidoscope effect would be achieved. When this was done, I had a full circle:

#.png

It is hard to say whether I managed to do proper transformations to the pieces and successfully achieved wanted results. To verify that, I added some dummy lines and this is what I got:#.png

Looks pretty interesting already. However, it’s even prettier if the angle of one piece is reduced to even more. This is the result of 15°:

#.png

As the basic structure of the stained-glass is done, following weeks will be dedicated to generative algorithms that will be used to fill in pieces of the design.

Types of Stained-Glass designs

This week was dedicated to research on stained-glass design types. Over this period of time, I was able to identify five major categories: Traditional Painted, Patterned, Contemporary/Modern, Tiffany Style and Faced.

Traditional painted stained-glass is often heavily painted, representing biblical scenes usually on windows of churches.

Here are some examples of Traditional painted stained-glass designs:

Epic-Pictures-Of-Church-Stained-Glass-Windows-27-For-Windows-Wallpaper-with-Pictures-Of-Church-Stained-Glass-Windows.jpg
Source: http://www.kingrichards.com


Patterned based stained-glasses are usually less complex in design, generally non-pictorial, containing geometric designs with repeating shapes, sizes, and colors that present symmetry. Patterned windows employ pieces of glass cut into geometric shapes, sometimes squares, rectangular or circular but most frequently diamond-shaped, creating a “diaper” pattern.

Examples of Patterned stained-glass:

Cerveny_kostel_okno_adj_straight.JPG
Source: http://www.kingrichards.com


Contemporary/Modern stained glass is often less painted, using larger bold-colored glass and is more abstract in design. These windows complement airy, modern structures with their clean lines and sleek design.

Examples of Contemporary/Modern stained glass:

image_181_large


Tiffany-styled stained glass often contains opaque or opalescent glass, overlaid with wide varieties in thickness. Frequently incorporating natural scenery elements into their work.

Examples of Tiffany-styled stained glass:

image_196_large
Source: http://www.kingrichards.com


Faceted glass employs thick slabs of colored glass, set into epoxy rather than lead cames. Its appearance often is reminiscent of mosaic, but the glass glows with light-filled color. They are a unique choice for a single statement window or for a set of related subject matter windows.

Examples of Faceted glass:

b384ffce910fa294257e6bbc7d5bb0c9

Sub-categories of Patterned Designs

The patterned category can be branched even further.

Repeating stained glass patterns uses 2-dimensional symmetry. They can be expanded to any side indefinitely with the same staring piece.

repeating_stained_glass_patterns.png
Source: http://www.craftsmanspace.com


Horizontal geometric stained glass patterns include the ones which can be indefinitely expanded to the sides.

collection_of_horizontal_geometric_stained_glass_patterns
Source: http://www.craftsmanspace.com


There is also a vertical geometric stained glass pattern which is very similar to the previous one.

collection_of_vertical_geometric_stained_glass_patterns
Source: http://www.craftsmanspace.com


Square stained glass patterns have reflection symmetry. All elements are lines or circles, except for the floral motifs that are drawn with curves. Some can be transformed into repeating stained glass design.

square_stained_glass_patterns


Circles can also be used as a base shape for patterned stained glass design where each design is made out of a single piece, usually either 30, 45 or 60 degrees wide. This type of designs is based on the Kaleidoscope effect.

stained-glass-pattern-books-floral-stained-glass-pattern-book-stained-glass-designs-pattern-books-floral-and-glass-stained-glass-pattern-books-ebay.jpg

14-kaleidoscope-stained-glass-window-series-amy-cicconi.jpg